Thursday, May 30, 2019

Polymer Clay Pearls


 I LOVE PEARLS... and I enjoy making them!


 It is amazing to me that I can cut a piece of Polymer Clay, roll and shape it, add luster, cure it and have any size or color of pearl imaginable to use in my PC creations. 

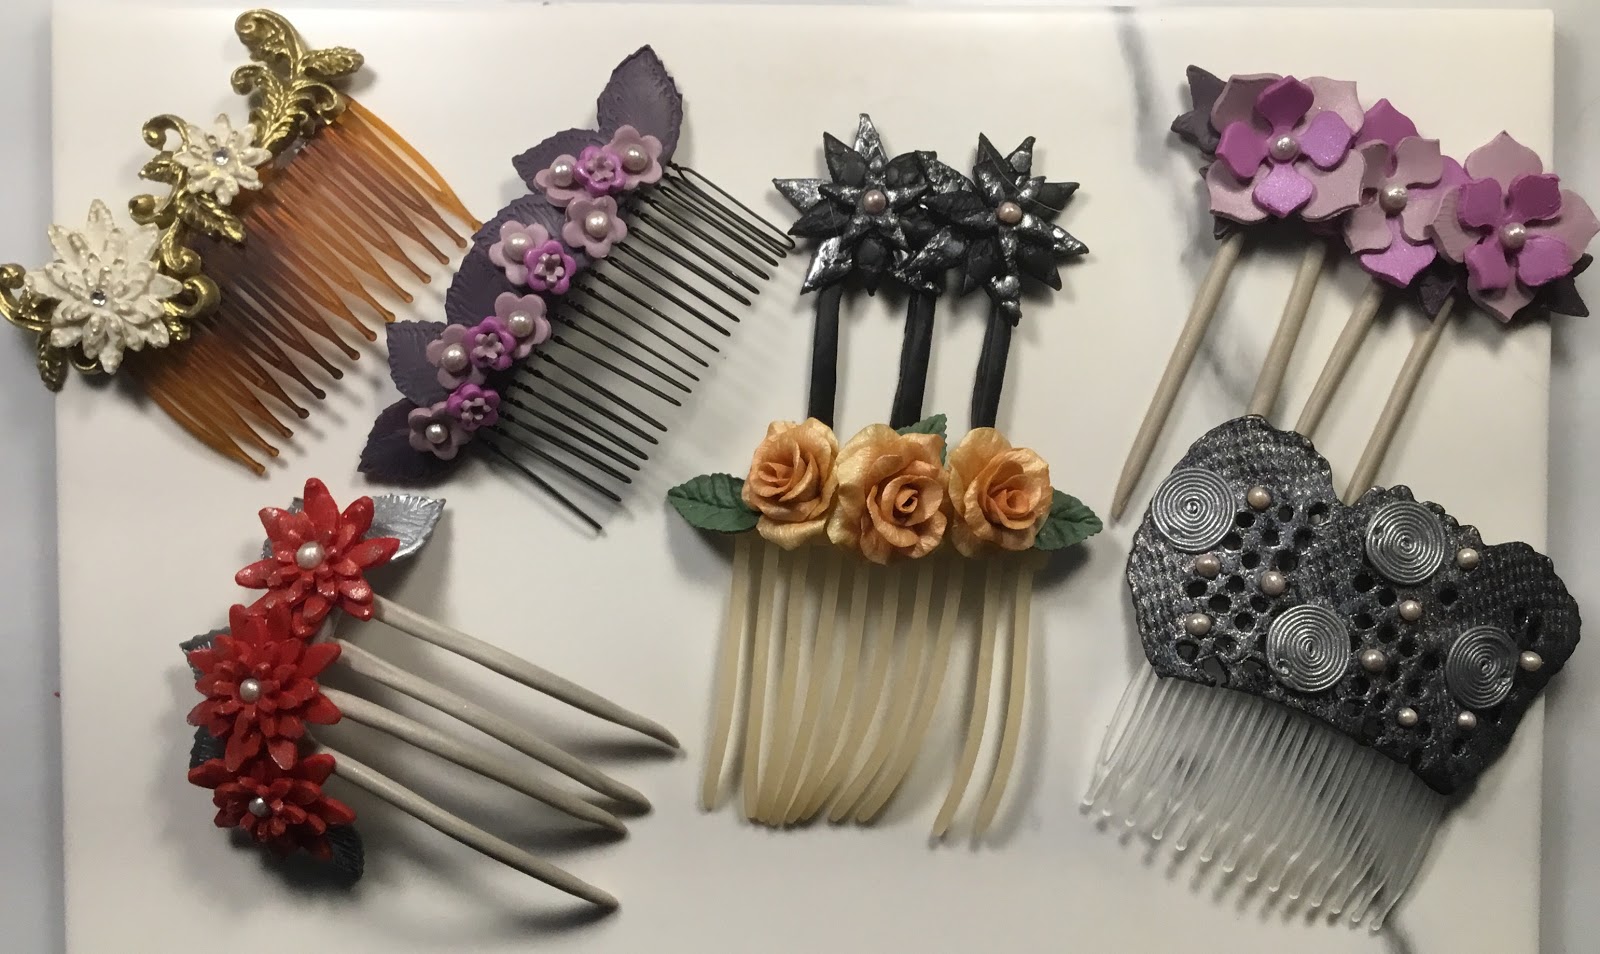
I want to show you the steps I use to make
  pearls, but first, the following pictures show some of my PC pieces decorated with pearls.


~~~~~~~~~~~~~~~~~~~~~~~~~~~~~~~~~~~~~~~~~~~~~~~~~~~~~~~~~~~~~
Let's get started...

You will need Polymer Clay, (any color will do)
(I use Premo for just about everything.)
Pearl Ex, Powdered Pigments #652
(This is what I use but I am sure other pearl mica powders or eye shadows would work)
Cutting tool
Fan folded card stock for baking. 

~~~~~~~~~~~~~~~~~~~~~~~~~~~~~~~~~~~~~~~~~~~~~~~~~~~~~~~~~

First, condition your clay to make it easy to shape. 

I usually roll the clay into a long strip (you can also use an extruder for this step) and cut the desired amount for each pearl according to the size you want to make. 

Pearl Ex Powdered Pigments, Macropearl #652

It's useful to have a little container handy so you can measure out a small amount of the Pearl Ex powder, you certainly don't want to take the risk of tipping over a full bottle of mica powder, trust me. ^^  After dipping your finger in the powder, roll it onto the clay while holding it in your opposite palm.


Place the pearls on the folded card stock for baking. 


To Cure, I start with a cold oven
 and set it at 275 degrees for 1 hour Plus 20 minutes for preheating. This is only how I do it but it may not work for your oven.  

If you have questions about baking your clay, check out this article at The Blue Bottle Tree Tutorials.

Pearls all finished, sorted and ready to go.


Wednesday, May 22, 2019

Decorative Hair Combs


This is a short post with no tutorial, these decorative hair combs are not that hard to make. I haven’t been working much with clay lately. After a long period of non-stop work, I am feeling a bit burned out but these combs are fun to make so I thought I would post them.  


The prongs on this comb are made with polymer clay. They don't have wire in them and they get flimsy from body heat when worn, so I tried to add wire to my next project below.


I extruded a wide ribbon of clay, placed a piece of wire in the middle and worked the clay around it.  


These prongs were baked sepreately then added to the decrative portion of the comb.  Even though I had two raw sections of clay with the prongs in the middle, they did not stick so the next time I added Bake and Bond to adhere them firmly.


These Red, White and Blue comb are
 perfect for those Patriotic Holiday outfits this Summer. 


Black combs are my favorites because they show up well on my light hair, so I made several in all black.

I found these metal combs on Amazon, they come from China and they are very inexpensive. Shipping takes a long time, but it is free and well worth the wait. 


Hope you have as much fun as I do making these Hair Ornaments. 


Heirloom Wedding Anniversary Book


With our 60th Anniversary fast approaching, I decided to do something with the book that was presented to us by the pastor who performed our wedding ceremony. It is a lovely book entitled. "Day By Day, We Magnify Thee", but after 60 years sitting on the shelf, it was getting a little tired looking.  


I started the refurbishing by carefully painting the entire cover with Metallic Gold Acrylic paint.  It was delicate work painting the small border inside the cover, but I think it looks much better. 


 The polymer clay decorations were pretty much as shown and where applied to a Gold polymer clay base which you can see in the photo. The flat clay base cover was baked and cooled before gluing it on to the book. I had some Swarovski Chrystals, so I glued them into the flower centers and I love the way they look, adds just a touch of bling. ^^
The little picture of us is laminated to keep it looking fresh. 


This is just another example of the many artistic uses for Polymer Clay, hope it gives you some creative ideas of your own.

Saturday, February 2, 2019

Hearts, Flowers and Lace


The other day, while cleaning out some storage areas, I came upon a stash of old lace left over from my sewing days. There were several pieces with a nice heavy weave so I decided to try and see what kind of impression they would make on Polymer Clay. Much to my surprise and delight, one of the crocheted pieces made a texture that looks very much like French Damask, and that is the texture I used to create this "French Flourish and Rose Box"


Supplies used in this project

4 oz Premo Accents Gold Clay
Small bits of colored clay for Flowers
Premo Accents Opal (for Heart)
Heart & Scroll molds 
Assorted Lace & Trim
Sculpty Bake & Bond
Pasta Machine
Super Glue 
craft knife
Gold acrylic paint
gold mica powder
~~~~~~~~~~~~~~~~~~~~~~~~~~
The project began with this pretty little porcelain box I found at the thrift store. If you have read any of my other posts, you know I like to rescue items and “redo” them. :)


These are some of the laces I found in my stash. There were only a few that were “heavy” enough to make an impression in clay, they are usually the hand crocheted pieces. Now that I know what great texture patterns you can get from crocheted items, I will be searching for damaged doilies at yard sales this Spring.


I used a roller to firmly embed the crochet into the clay.


Look at the beautiful texture the lace made! This is the kind of thing that inspires me to create with Polymer clay, this pattern is just gorgeous!! 


And here is a piece of trim I found, it makes a deep impression and a lovely border.

Ready to go in the oven for a first bake.  I bake my clay for 1 hour at 275 degrees.
I found this mold on Amazon, it came from China and took forever to arrive (over a month), but it was well worth the wait and it was under $2. The scrolls are beautiful and can be arranged in many different patterns. They remind me of French Ormolu. The only drawback is the difficulty in putting the clay into the mold, it has to be done in many stages to get all the detail. I included a photo to show the mold loaded, hope you can see how many "joins" I had to make to get the clay in correctly. After the pieces are cured, I use a cuticle clipper to cut away the excess.
 I add very shiny acrylic paint to the pieces. I discovered something that works well for me. Just plain Metallic Gold paint doesn't give me the effect I want, so I mix gold mica power into the gold acrylic.

These pieces are very shiny and ready for my next project. Ever since I learned that I could bake components more than one time, it improved my work. Now I can have things ready in advance to decorating my creations.
 
These roses I made a while back, they will be ready to go when I am.  I find it very relaxing to make roses, so I do that when I can't think of anything else to make. :)
~~~~~~~~~~~~~~~~~~~
Finished Heart & Flowers box, hope you enjoyed seeing my Valentines project
 as much as I enjoyed sharing it with you.


Friday, January 25, 2019

The Rainbow Bottle

Inlaid Polymer Tiles in Rainbow Design
( A tutorial on how these tiles were made, is in the preceding post.

This bottle is the first inlaid tile piece I made that I am really happy with. It is fiddly work but I think it is well worth the effort. 

~~~~~~~~~~~~~~~~~~~~~~~~~~~


I cut curved shapes from a rainbow design to test size and shape on the bottle. I knew this project was going to be a lot of work and I didn't want to begin without having a plan. You know the old saying, "If you fail to plan, you are planning to fail". ^^


I then taped the paper pattern to the bottle to see how the design would look.


These are the colors I chose that would be closest to the rainbow design. (How the tiles were made is explained in the preceding tutorial, Inlaid Tiles)


Using the patterns, I cut out shapes from white translucent clay that was rolled on #5 on my pasta machine and arranged them on the bottle.


This is the beginning of the tile adding process.
 The tiles range from 1/8" to 5/8" in length and 16" to 1/8" in width. 

In this video, you can see the bottle all the way around.