Wednesday, November 28, 2018

Pink Roses & Forget Me Nots with Shimmering Gold Lace

Translucent Lace Tutorial


This vase was decorated with a new technique ( for me), I wanted to create a realistic shimmering lace to change the profile of the vase..  Below is what the vase looked like before decorating with PC.


~~~~~~~~~~~~~~~~~~~~~~~~~~~~~~~~~


The roses were made first then the leaves and little blue flowers.


When I started to add the flowers, the vase just didn't look right so I decided to try and add translucent lace, if possible, to soften the whole effect. Here are pictures of the steps I used to make the lace.
 . 
This lace dollie was rolled into a sheet of Premo Accents  white Translucent clay. The clay was conditioned on the pasta machine at a 4 or 5 setting.  It's important to keep the clay as thin as possible to make it more translucent and ethereal after curing. but if the clay is too thin, it will sag and break at the cut out areas, 

Using a straw, or a small punch, "cut" the holes in the lace. (Try not to get them too close together because they will most likely break when gravity pulls the clay down. (Several of my holes broke so I know this from experience) :)


I used gold mica powder to add the metallic shimmer to the lace and then I cut it out with a craft knife.


It was ready to drape onto the vase in a pleasing way, if possible. The pictures below show how I arranged it.


Ready to go into the oven.  I used Polyester fiber fill to "plump" out the lace before baking. Gravity still pulled it down so I cured it face up laying on a bed of fiber fill.  The lace was a little wonky on the left side when I took it out of the oven, so I reattached it with the help of super glue.

I place my clay in a cold oven then set it for 275 degrees.
 It bakes for 1 hour and 20 minutes.

I think this technique has a lot of potential to add soft flowing lines to our creations. If you try to make some of this beautiful lace. please share your creation with me, I can learn from your experience also. Please contact me on Facebook or leave a comment here in blogger.

Facebook user name, "Evie Campbell"


Wednesday, November 21, 2018

Faux Frog Pate de verre


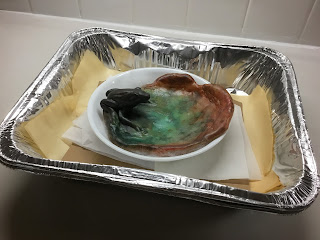
This is the Original Pate de vere Frog Dish


This is my copy:


Pate de verre definition: 
 a decorative glass made in a mold 
in which powdered glass of various hues
 is mixed, blended, and fused. 

 ~~~~~~~~~~~

To create this Frog Dish
You will need:

Premo Translucent Clay
Pasta machine or rolling pin
(Opt: round glass paper weight)
Tubed water colors
(Hunter green, Sepia, Thalo Green)
Soft Pastels
(Rust, DK Brown, Black)
Tissue blade
Assorted sculpting tools
Corn starch
polyester batting (to shape while curing)
dish to hold shape with curing
Optional but helpful, A ton of patience!


Condition enough clay to create the size bowl you want to make.


Scrape some soft pastels to color the clay. (Rust & Dk Brown)


Roll some of the clay on the medium setting of your pasta machine and begin to color. This is a very messy process.  I also started using tubed water colors to try to match the colors in the original. You can add water to the water colors to try and blend and smooth, but it seems to be impossible to copy the look of Pate de verre exactly. 


This close up shows the tiny marks caused by scraping larger pieces of pastel.
 It’s hard to get rid of these spots once they get into the clay.


You can see the picture of the Frog Dish I was trying to copy, try to get your colors as close as possible.  Begin to shape the dish by pushing the clay in around the edges.


Roll the clay to get the colors to blend. (getting the colors blended is the hardest part of this whole process). I found that using a small glass paper weight helps to roll the clay and it doesn’t interfere with the raised edge as a roller would.


Begin to add Black (or Sepia) to the section where the frog will be sitting, and color some of the clay for the frog sculpture. I used tubed Sepia watercolor for this.


This is where it really gets messy. :)


The dish is starting to take shape, and it's smaller as well. 
Time to start sculpting the frog.


I was trying to get the frog to look as close as the original as possible.


When you have finished sculpting, time to position the dish into a form for baking. 

 
 This picture shows how I placed the clay in a dish, there is also some polyester batting underneath to make the slope closer to the original.


I placed the dish in a cold oven and set the temperature for 275 degrees, 
then set the timer for 1:40 minutes.

When curing is finished. allow the clay to cool completely while it's
 still in the dish so that the shape remains the same.
I buffed with a dremel to make it shine. 


That's it, Hope you enjoyed the tutorial.

~~~~~~~~~~~~~~~~~~~~~~~~~~
 If you make your own Pate de verre Frog,
 please send me a picture and share your experience with me.
  You can find me on facebook  User name, "Evie Campbell". 


Saturday, November 17, 2018

Polymer Clay Butterflies


This tutorial will describe how I make these realistic, translucent butterflies. 


Items you will need:

Premo Translucent Polymer Clay
Black & White butterfly picture
Piece of glass
Scotch Tape
Pasta machine or rolling pin
Soft Pastels
Exacto Knife
Tissue Blade
Black Acrylic paint and fine point brush,
or Black Sharpi Pen
(optional)
Extruder, tiny round bit and Black clay.
~~~~~~~~~~~~~~~~~~~~~~~~~~~~~~~~~~~~~~~~~~~~~~


Look for a black and white graphic of the butterfly you want to create. I found this beautiful Monarch Butterfly on the computer and printed it out with black ink.


Tape the picture to a piece of glass with the picture facing down so it shows through the glass. 

 Condition your clay well and roll it to the thinnest setting on your pasta machine,
 (#9 on my machine)

Lay the clay over the glass so the picture shows through. Be careful not to trap air as you lay it down, but that's hard to do with clay this thin. If you get any bubbles, just break them with a pin.

I used soft pastel to color my clay, ... after I rubbed the color on with my finger, I added water to smooth it out and make the color more transparent . 


Following the graphic lines, carefully cut the clay around the edges of the butterfly with a craft knife.  It may be a bit hard to see the pattern underneath, but once the clay is cured it will be more transparent.


At this point, you can add more detail as shown below. 


Keep the clay attached to the glass and paper and bake for 1 hour at 275 degrees. (Yes, I know it's very thin clay, but I bake everything for one hour. :)

After the butterfly has cooled, time to add the detail. I used black acrylic paint to show the veining on the wings, but you could use a fine black Sharpi pen if you want, it would make it easier. I used a Sharpi on the small butterflies. The pen could fade in time, just a thought.


When the paint is dry, time to remove your butterfly. 
Hold them up to the light, they look so pretty. :)

The butterfly will be completely flat when removed from the glass and the underside will be shiny, but that can't be helped...

 I received a great tip from Nancy Couste', she suggests "removing shiny spots left on pieces after curing on a shiny surface by dipping a cotton swab in pure acetone and lightly rubbing over the shine"  Her tip works like a charm, thanks Nancy!  I used 98% acetone finger nail polish remover on the reverse side of the butterfly and it made a nice mat finish. Be careful not to get to much near the edges because I had a little bit of the acetone escaped to the front side and remove the paint. It can easily be touched up, just be careful with the acetone, powerful stuff! :)

My efforts to reshape Premo clay after curing has not worked very well, so to create a more naturalistic pose, add a tiny bit of super glue with a toothpick along the sides of the body and clamp the wings closed for a short time until the glue sets. 
~~~~~~~~~~~~~~~~~~~~~~~~~~~~~


Hope you enjoyed this tutorial as much as I enjoyed bring it to you. 


Wednesday, November 7, 2018

Making Faux Pate de verre with Polymer Clay


Pate de verre definition: 
 a decorative glass made in a mold 
in which powdered glass of various hues
 is mixed, blended, and fused. 
~~~~~~~~~~~~~~~~~~~~~~~~~~~~

The dish in the photo above is a prime example of pate de verre and was the inspiration for this tutorial. Since polymer clay comes in translucent, but not transparent, it is impossible to get the same glass effect but the result is still worth the effort, in my opinion. My main objective was to make the separate colors gradually blend together.   The most important part is to keep the clay as translucent as possible.


This is a messy job as you will see. :) 

I used White Premo Translucent clay that was conditioned with a pasta machine. Use as much as you need for the size dish you want to make. To add color, I started out with some dark green soft pastel then switched to tube water colors.  Apply the water colors to thin slabs of clay and fold them over,


 layer the slabs into the general shape you want to achieve. At this point, the most important part is to get the colors right, you can change the shape later. Adjust the colors to your liking. I added water to help blend them. 


keep building up the layers as you go.


When you have the colors the way you wan, use a roller to smooth the clay. 

Begin pushing in the edges of the clay to make the rim thick enough to sculpt. The modeling was done with assorted sculpting tools and a knitting needle.  
 At this point, I noticed the color wasn't right in the center of the dish so I added Veridian Green.

The texture was added with a ball tool, as shown.


t
To bake the clay, I arranged a bed of Polyester batting in a bowl as shown and gently laid the clay inside to achieve a gentle slop.
Keep adjusting the batting until you have soft slopping effect you want.
 ~~~~~~~~~~~~~~~~~~~~~~~~~~~~~~~~~~~~~~~~~~~~~~~~~~
To cure the clay, I placed the dish in a cold oven and set the timer for 1 hour and 20 minutes.Then set the oven to 275 degrees.

That's it, hope this tutorial was helpful. :)